View 的工作原理上 View 绘制流程梳理及 Measure 过程详解

-文章来源:itsCoder 的 WeeklyBolg 项目

1 前言

笔记内容源于Android 开发艺术探索。

View 是 Android 中所有控件的基类,例如 Button 和 TextView、ViewGroup 等常见控件他们的基类都是 View,View 是一种界面层的控件的一种抽象,代表了一个控件。View 本身可以是单个控件也可以是由多个控件组成的一组控件,通过这种关系就形成了 View 树的结构。Android 系统本身就提供好了很多好用的 View,你也可以自己根据需求去自定义一个 View,拿最简单的一个例子来说,当我们想在界面上显示一行文字的时候,我们会在 xml 文件中写好布局然后在 Activity 中的 onCreate 方法中使用 setContentView 方法来加载布局就可以显示出我们想要的文字,这时候你是否有思考过这个过程是怎么完成的, View 是如何被显示到界面上的;还有一个我们经常遇到的问题是:当我们在一个 ScrollView 控件内部嵌套一个 ListView 的时候 ListView 只会显示一行;当使用自定义的 View 的时候,View 可以显示到界面,但是当使用 WrapContent 属性的时候不起作用,这些问题笔者就曾都遇到过,如果你也曾有过这样的疑问,可以阅读以下这篇文章。

1.1 主要内容简介

View 的工作原理主要包含 View 的三大流程 onMeasure()、onLayout()和onDraw() ,而由于一次性全部写完内容会有点长,所以本次主要先介绍关于 View 的工作流程的整体梳理和 Measure 过程相关知识,而下一篇笔记会把剩下的部分写完。

2 初识 ViewRoot 和 DecorView

在正式介绍 View 的三大流程 onMeasure()、onLayout()和onDraw() 之前,先简单介绍一下当我们在 Activity 方法 onCreate 里执行 setContentView 之后 View 是如何显示到屏幕上的,这里我们就不分析源码过程了,因为这个过程不是我们要分析的重点,只是辅助我们去理解,有助于我们对整个流程有更好的理解和把握。

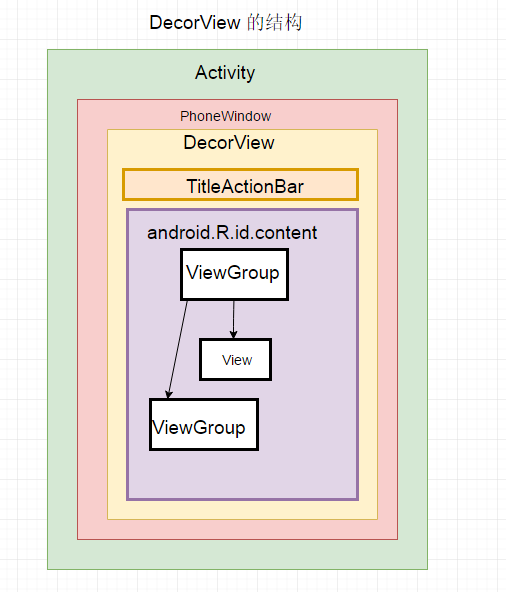
当调用 Activity 的 setContentView 方法后会调用 PhoneWindow 类 的 setContentView 方法,PhoneWindow 类是抽象类Window的实现类,Window 类用来描述 Activity 视图最顶端的窗口显示和行为操作,PhoneWindow 类 的 setContentView 方法中最终会 生成一个 DecorView 对象,DecorView 是 PhoneWindow类的内部类,继承自FrameLayout ,所以调用 Activity 方法 setContetnView 后最终会生成一个 FrameLayout 类型的 DecorView 组件,该组件将作为整个应用窗口的顶层图,然后在 DecorView 容器中添加根布局,根布局中包含一个 id 为 contnet 的 FrameLayout 内容布局,我们的 Activity 加载的布局 xml 最后通过LayoutInflater 将 xml 内容布局解析成 View 树形结构,最后添加到 id 为 content 的 FrameLayout布局当中,至此,View 最终就会显示到手机屏幕上,如果想详细了解出门右转从ViewRootImpl类分析View绘制的流程——废墟的树。整理流程梳理可以参考下面这张图片:

decorView_view

我们了解了上面得到流程后下面梳理一下如何进入到 view 的绘制流程:

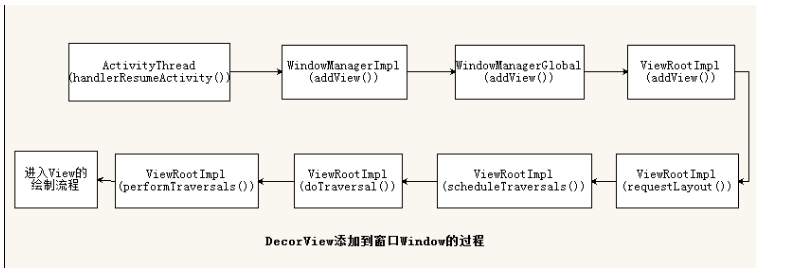
ViewRoot 对应的实现类是 ViewRootImpl 类,他是连接 WindowManager 和DecorView 的纽带,view 的三大 流程均是通过 ViewRoot 来完成的。在 ActivityThread 中,当 activity 对象被创建完毕后,会将 DecorView 添加到Window 中,同时会创建 ViewRootImpl 对象,并将 ViewRootImpl 对象和 DecorView 建立关联。这个流程可以参考下图,图片来自从ViewRootImpl类分析View绘制的流程——废墟的树

decorView

View 的绘制流程是从 ViewRoot 的 performTraversals 方法开始的,它经过 measure、layout、draw 三个过程才能最终将一个 View 绘制出来,其中 measure 用来测量 View 的宽和高,layout 用来确定 View 在父容器的放置位置,而 draw 则负责将 View 绘制在屏幕上,参考下图(来源艺术探索截图) :

view

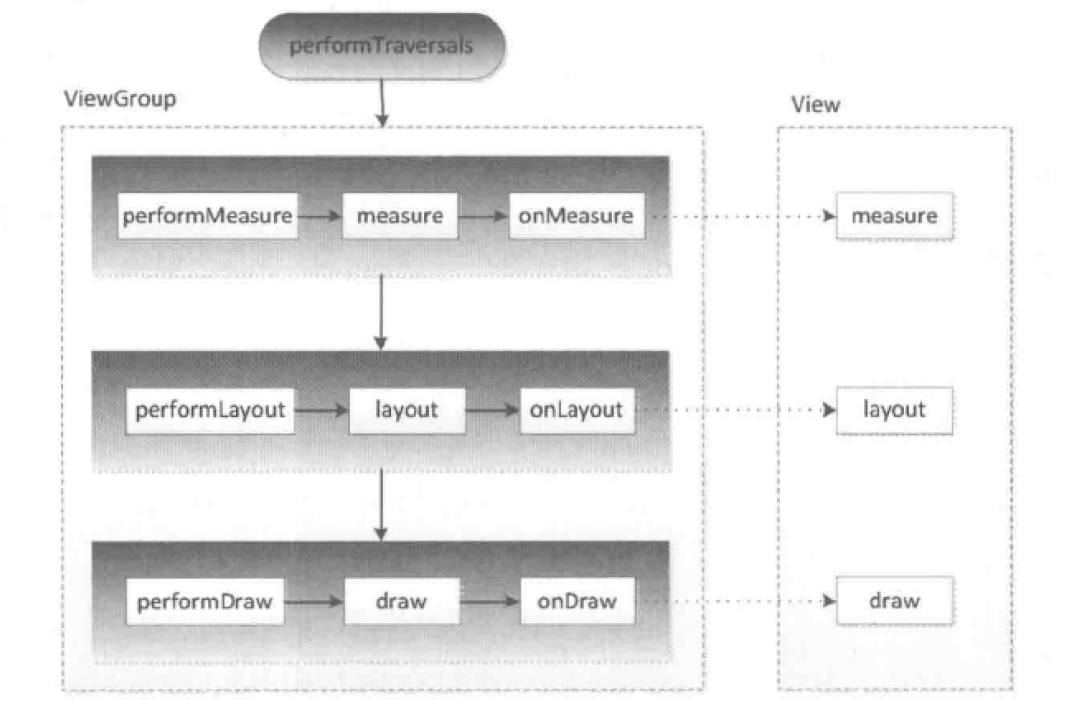
performTraversals 会依次调用 performMeasure、performLayout、performDraw 三个方法,这三个方法分别完成顶级 View 的 measure、layout 和 draw 这三大流程,其中 performMeasure 会调用 measure 方法,在measure 方法中又会调用 onMeasure 方法,在 onMeasure 方法中对所有的子元素进行 measure 过程,这个时候 measure 流程就会从父容器传递到子元素中了,这样就完成了一次 measure 过程。接着子元素就会重复父容器的 measure 过程,如此反复就完成了整个 View 树的遍历,同理 perFormLayout 和 performDraw 的流程也是类似。

measure 过程决定了 view 的宽高,在几乎所有的情况下这个宽高都等同于 view 最终的宽高,但特殊情况除外。layout 过程决定了 view 的四个顶点的坐标和 view实 际的宽高,通过 getWidthgetHeight 方法可以得到最终的宽高。draw过程决定了view的显示。

DecorView 其实是一个 FrameLayout,其中包含了一个竖直方向的 LinearLayout,上面是标题栏,下面是内容栏(id为android.R.id.content)。

3 理解MeasureSpec

MeasureSpec 是 View 测量过程中的一个关键参数,很大程度上决定了 View 的宽高,父容器会影响 View 的 MeasureSpec 的创建,MeasureSpec 不是唯一由 LayoutParams 决定的,LayoutParams 需要和父容器一起才能决定 View 的MeasureSpec,从而进一步确定 View 的宽高,在 View 测量过程中,系统会将该 View 的 LayoutParams 参数在父容器的约束下转换成对应的 MeasureSpec ,然后再根据这个 measureSpec 来测量 View 的宽高。

MeasureSpec 代表一个32位 int 值,高2位代表 SpecMode(测量模式),低30位代表 SpecSize(在某个测量模式下的规格大小),MeasureSpec 通过将 SpecMode 和 SpecSize 打包成一个 int 值来避免过多的内存分配,为了方便操作,其提供了打包和解包方法源码如下:

1
2
3
4
5
6
7
8
9
10
11
12
13
14
15
16
//通过将 SpecMode 和 SpecSize 打包,获取 MeasureSpec
public static int makeMeasureSpec(int size, int mode) {
if (sUseBrokenMakeMeasureSpec) {
return size + mode;
} else {
return (size & ~MODE_MASK) | (mode & MODE_MASK);
}
}
//将 MeasureSpec 解包获取 SpecMode
public static int getMode(int measureSpec) {
return (measureSpec & MODE_MASK);
}
//将 MeasureSpec 解包获取 SpecSize
public static int getSize(int measureSpec) {
return (measureSpec & ~MODE_MASK);
}

SpecMode 有三类,每一类都表示特殊的含义:

  1. UNSPECIFIED 父容器不对 View 有任何的限制,要多大给多大,这种情况下一般用于系统内部,表示一种测量的状态。
  2. EXACTLY 父容器已经检测出 View 所需要的精确大小,这个时候 View 的最终大小就是 SpecSize 所指定的值,它对应于LayoutParams 中的 match_parent 和具体的数值这两种模式
  3. AT_MOST 父容器指定了一个可用大小即 SpecSize,View 的大小不能大于这个值,具体是什么值要看不同 View 的具体实现。它对应于 LayoutParams 中的 wrap_content。

4 MeasureSpec 和 LayoutParams 的对应关系

对于DecorView,它的 MeasureSpec 由窗口的尺寸和其自身的 LayoutParams 来决定;对于普通 View,它的MeasureSpec 由父容器的 MeasureSpec 和自身的 LayoutParams 来共同决定。

对普通的 View 的 measure 方法的调用,是由其父容器传递而来的,这里先看一下 ViewGroup 的 measureChildWithMargins 方法:

1
2
3
4
5
6
7
8
9
10
11
12
13
14
15
16
17
18
19
20
21
22
23
24
25
26
27
28
* @param child 要被测量的 View
* @param parentWidthMeasureSpec 父容器的 WidthMeasureSpec
* @param widthUsed 父容器水平方向已经被占用的空间,比如被父容器的其他子 view 所占用的空间
* @param parentHeightMeasureSpec 父容器的 HeightMeasureSpec
* @param heightUsed 父容器竖直已经被占用的空间,比如被父容器的其他子 view 所占用的空间
*/
protected void measureChildWithMargins(View child,
int parentWidthMeasureSpec, int widthUsed,
int parentHeightMeasureSpec, int heightUsed) {
//第一步,获取子 View 的 LayoutParams
final MarginLayoutParams lp = (MarginLayoutParams) child.getLayoutParams();
//第二步,获取子 view 的 WidthMeasureSpec,其中传入的几个参数说明:
//parentWidthMeasureSpec 父容器的 WidthMeasureSpec
//mPaddingLeft + mPaddingRight view 本身的 Padding 值,即内边距值
//lp.leftMargin + lp.rightMargin view 本身的 Margin 值,即外边距值
//widthUsed 父容器已经被占用空间值
// lp.width view 本身期望的宽度 with 值
final int childWidthMeasureSpec = getChildMeasureSpec(parentWidthMeasureSpec,
mPaddingLeft + mPaddingRight + lp.leftMargin + lp.rightMargin
+ widthUsed, lp.width);
//获取子 view 的 HeightMeasureSpec
final int childHeightMeasureSpec = getChildMeasureSpec(parentHeightMeasureSpec,
mPaddingTop + mPaddingBottom + lp.topMargin + lp.bottomMargin
+ heightUsed, lp.height);
// 第三步,根据获取的子 veiw 的 WidthMeasureSpec 和 HeightMeasureSpec
//对子 view 进行测量
child.measure(childWidthMeasureSpec, childHeightMeasureSpec);
}

从上代码第二步可以看出,子 view 的 MeasureSpec 的创建与父容器的 MeasureSpec 、子 view 本身的 LayoutParams 有关,此外还与 view 本身的 margin 和 padding 值有关,具体看一下 getChildMeasureSpec 方法:

1
2
3
4
5
6
7
8
9
10
11
12
13
14
15
16
17
18
19
20
21
22
23
24
25
26
27
28
29
30
31
32
33
34
35
36
37
38
39
40
41
42
43
44
45
46
47
48
49
50
51
52
53
54
55
56
57
58
59
60
61
62
63
64
65
66
67
68
69
70
71
72
73
74
75
76
77
78
79
80
81
82
83
84
85
86
87
88
89
90
91
92
/*
* @param spec 父容器的 MeasureSpec,是对子 View 的约束条件
* @param padding 当前 View 的 padding、margins 和父容器已经被占用空间值
* @param childDimension View 期望大小值,即layout文件里设置的大小:可以是MATCH_PARENT,
*WRAP_CONTENT或者具体大小, 代码中分别对三种做不同的处理
* @return 返回 View 的 MeasureSpec 值
*/
public static int getChildMeasureSpec(int spec, int padding, int childDimension) {
// 获取父容器的 specMode,父容器的测量模式影响子 View 的测量模式
int specMode = MeasureSpec.getMode(spec);
// 获取父容器的 specSize 尺寸,这个尺寸是父容器用来约束子 View 大小的
int specSize = MeasureSpec.getSize(spec);
// 父容器尺寸减掉已经被用掉的尺寸
int size = Math.max(0, specSize - padding);
int resultSize = 0;
int resultMode = 0;
switch (specMode) {
// 如果父容器是 EXACTLY 精准测量模式
case MeasureSpec.EXACTLY:
//如果子 View 期望尺寸为大于 0 的固定值,对应着 xml 文件中给定了 View 的具体尺寸大小
//如 android:layout_width="100dp"
if (childDimension >= 0) {
//那么子 View 尺寸为期望值固定尺寸,测量模式为精准测量模式 EXACTLY
resultSize = childDimension;
resultMode = MeasureSpec.EXACTLY;
//如果子 View 期望尺寸为 MATCH_PARENT 填充父布局
} else if (childDimension == LayoutParams.MATCH_PARENT) {
// 那么子 View 尺寸为 size 最大值,即父容器剩余空间尺寸,为精准测量模式 EXACTLY
//即子 View 填的是 Match_parent, 那么父 View 就给子 View 自己的size(去掉padding),
//即剩余全部未占用的尺寸, 然后告诉子 View 这是 Exactly 精准的大小,你就按照这个大小来设定自己的尺寸
resultSize = size;
resultMode = MeasureSpec.EXACTLY;
//如果子 View 期望尺寸为 WRAP_CONTENT ,包裹内容
} else if (childDimension == LayoutParams.WRAP_CONTENT) {
//子 View 尺寸为 size 最大值,即父容器剩余空间尺寸 ,测量模式为 AT_MOST 最大测量模式
//即子 View 填的是 wrap_Content,那么父 View 就告诉子 View 自己的size(去掉padding),
//即剩余全部未占用的尺寸,然后告诉子 View, 你最大的尺寸就这么多,不能超过这个值,
//具体大小,你自己根据自身情况决定最终大小。一般当我们继承 View 基类进行自定义 View 的时候
//需要在这种情况下计算给定 View 一个尺寸,否则当使用自定义的 View 的时候,使用
// android:layout_width="wrap_content" 属性就会失效
resultSize = size;
resultMode = MeasureSpec.AT_MOST;
}
break;
// 父容器为 AT_MOST 最大测量模式
case MeasureSpec.AT_MOST:
// 子 View 期望尺寸为一个大于 0的具体值,对应着 xml 文件中给定了 View 的具体尺寸大小
//如 android:layout_width="100dp"
if (childDimension >= 0) {
//那么子 View 尺寸为期望固定值尺寸,为精准测量模式 EXACTLY
resultSize = childDimension;
resultMode = MeasureSpec.EXACTLY;
//如果子 View 期望尺寸为 MATCH_PARENT 最大测量模式
} else if (childDimension == LayoutParams.MATCH_PARENT) {
//子 View 尺寸为 size,测量模式为 AT_MOST 最大测量模式
//即如果子 View 是 Match_parent,那么父 View 就会告诉子 View,
//你的尺寸最大为 size 这么大(父容器尺寸减掉已经被用掉的尺寸,即父容器剩余未占用尺寸),
//你最多有父 View的 size 这么大,不能超过这个尺寸,至于具体多大,你自己根据自身情况决定。
resultSize = size;
resultMode = MeasureSpec.AT_MOST;
} else if (childDimension == LayoutParams.WRAP_CONTENT) {
//同上
resultSize = size;
resultMode = MeasureSpec.AT_MOST;
}
break;
// 父容器为 UNSPECIFIED 模式
case MeasureSpec.UNSPECIFIED:
// 子 View 期望尺寸为一个大于 0的具体值
if (childDimension >= 0) {
//那么子 View 尺寸为期望值固定尺寸,为精准测量模式 EXACTLY
resultSize = childDimension;
resultMode = MeasureSpec.EXACTLY;
//如果子 View 期望尺寸为 MATCH_PARENT 最大测量模式
} else if (childDimension == LayoutParams.MATCH_PARENT) {
//子 View 尺寸为 0,测量模式为 UNSPECIFIED
// 父容器不对 View 有任何的限制,要多大给多大
resultSize = View.sUseZeroUnspecifiedMeasureSpec ? 0 : size;
resultMode = MeasureSpec.UNSPECIFIED;
//如果子 View 期望尺寸为 WRAP_CONTENT ,包裹内容
} else if (childDimension == LayoutParams.WRAP_CONTENT) {
//子 View 尺寸为 0,测量模式为 UNSPECIFIED
// 父容器不对 View 有任何的限制,要多大给多大
resultSize = View.sUseZeroUnspecifiedMeasureSpec ? 0 : size;
resultMode = MeasureSpec.UNSPECIFIED;
}
break;
}
return MeasureSpec.makeMeasureSpec(resultSize, resultMode);
}

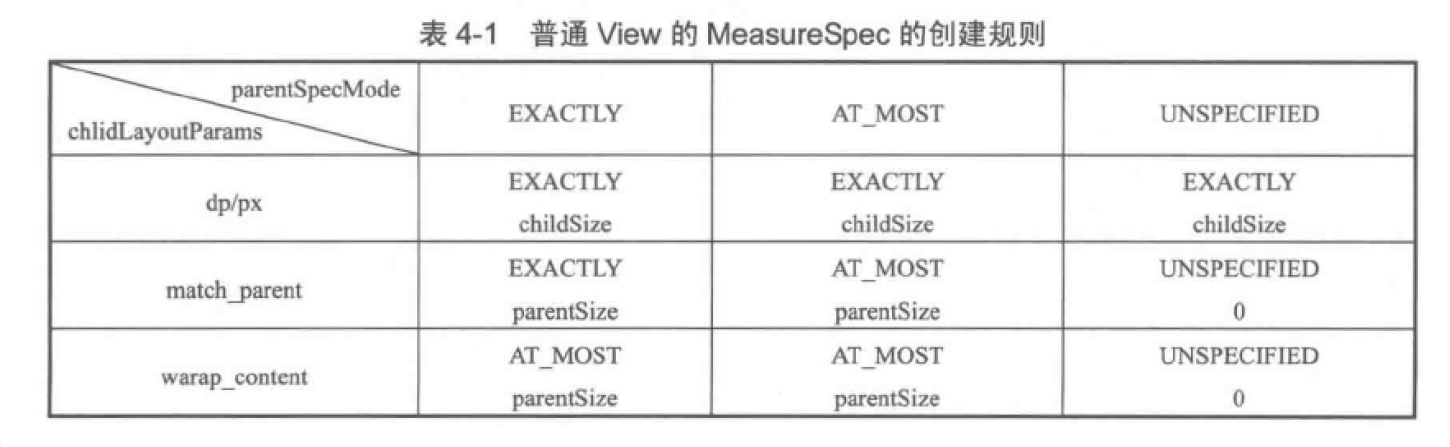
以上代码主要作用就是根据父容器的 MeasureSpec 和 view 本身的 LayoutParams 来确定子元素的 MeasureSpec 的整个过程,这个过程清楚的展示了普通 view 的 MeasureSpec 的创建规则,整理一下可得到如下表格(来源艺术探索截图):

mesureSpec总结:

  1. 当 View 采用固定宽高时,不管父容器的 MeasureSpec 是什么,View 的 MeasureSpec 都是精确模式,并且大小是LayoutParams 中的大小。
  2. 当 View 的宽高是 match_parent 时,如果父容器的模式是精确模式,那么 View 也是精确模式,并且大小是父容器的剩余空间;如果父容器是最大模式,那么 View 也是最大模式,并且大小是不会超过父容器的剩余空间。
  3. 当 View 的宽高是 wrap_content 时,不管父容器的模式是精确模式还是最大模式,View 的模式总是最大模式,并且大小不超过父容器的剩余空间。

5 View 的工作流程

View 的工作流程主要是指 measure、layout、draw 这三大流程,即测量、布局和绘制,其中 measure 确定 View 的测量宽和高,layout 确定 View 的最终宽和高及 View 的四个顶点位置,而 draw 是将 View 绘制到屏幕上。

5.1 measure 过程

分两种情况:

  1. 如果只是一个原始的 View,通过measure方法就完成了测量过程。
  2. 如果是一个 ViewGroup 除了完成自己的测量过程还会遍历调用所有子 View 的measure方法,而且各个子 View 还会递归执行这个过程。

5.1.1 View 的 measure 过程

View 的 measure 过程由 measure 方法来完成, measure 方法是一个 final 类型,子类不可以重写,而 View 的 measure() 方法中会调用 onMeasure 方法,因此我们只需要分析 onMeasure 方法即可,源码如下:

1
2
3
4
5
6
7
8
9
/**
* @param widthMeasureSpec 父容器所施加的水平方向约束条件
* @param heightMeasureSpec 父容器所施加的竖直方向约束条件
*/
protected void onMeasure(int widthMeasureSpec, int heightMeasureSpec) {
//设置 view 高宽的测量值
setMeasuredDimension(getDefaultSize(getSuggestedMinimumWidth(), widthMeasureSpec),
getDefaultSize(getSuggestedMinimumHeight(), heightMeasureSpec));
}

上面方法很简单,就是给 View 设置了测量高宽的测量值,而这个测量值是通过 getDefaultSize 方法获取,那么接着分析 getDefaultSize 方法:

1
2
3
4
5
6
7
8
9
10
11
12
13
14
15
16
17
18
19
20
21
22
23
24
25
26
27
28
/**
* @param size view 的默认尺寸,一般表示设置了android:minHeight属性
*或者该View背景图片的大小值
* @param measureSpec 父容器的约束条件 measureSpec
* @return 返回 view 的测量尺寸
*/
public static int getDefaultSize(int size, int measureSpec) {
int result = size;
//获取测量模式
int specMode = MeasureSpec.getMode(measureSpec);
//获取尺寸
int specSize = MeasureSpec.getSize(measureSpec);
switch (specMode) {
case MeasureSpec.UNSPECIFIED:
//如果 测量模式为 UNSPECIFIED ,表示对父容器对子 view 没有限制,那么 view 的测量尺寸为
//默认尺寸 size
result = size;
break;
case MeasureSpec.AT_MOST:
case MeasureSpec.EXACTLY:
//如果测量模式为 AT_MOST 最大测量模式或者 EXACTLY 精准测量模式,
//那么 View 的测量尺寸为 MeasureSpec 的 specSize
//即父容器给定尺寸(父容器当前剩余全部空间大小)。
result = specSize;
break;
}
return result;
}

这里来分析一下 UNSPECIFIED 条件下 View 的测量高宽默认值 size 是通过 getSuggestedMinimumWidth() 和 getSuggestedMinimumHeight() 函数获取,这两个方法原理一样,这里我们就看一下 getSuggestedMinimumHeight() 源码:

1
2
3
protected int getSuggestedMinimumHeight() {
return (mBackground == null) ? mMinHeight : max(mMinHeight, mBackground.getMinimumHeight());
}

上面代码可以看出,如果 View 没有背景,View 的高度就是 mMinHeight,这个 mMinHeight 是由 android:minHeight 这个属性控制,可以为 0,如果有背景,就返回 mMinHeight 和背景的最小高度两者中的最大值。

从 getDefaultSize 方法可以看出,View 的高/宽由 父容器传递进来的 specSize 决定,因此可以得出结论:

直接继承自 View 的自定义控件需要重写 onMeasure 方法来设置 wrap_content 时候的自身大小,而设置的具体值需要根据实际情况自己去计算或者直接给定一个默认固定值,否则在布局中使用 wrap_content 时候就相当于使用 match_parent ,因为在布局中使用 wrap_content 的时候,它的 specMode 是 AT_MOST 最大测量模式,在这种模式下 View 的宽/高等于 speceSize 大小,即父容器中可使用的大小,也就是父容器当前剩余全部空间大小,这种情况,很显然,View 的宽/高就是等于父容器剩余空间的大小,填充父布局,这种效果和布局中使用 match_parent 一样,解决这个问题代码如下:

1
2
3
4
5
6
7
8
9
10
11
12
13
14
15
16
17
18
@Override
protected void onMeasure(int widthMeasureSpec, int heightMeasureSpec) {
super.onMeasure(widthMeasureSpec, heightMeasureSpec);
int widthSpecMode = MeasureSpec.getMode(widthMeasureSpec);
int widthSpecSize = MeasureSpec.getSize(widthMeasureSpec);
int heightSpecMode = MeasureSpec.getMode(heightMeasureSpec);
int heightSpecSize = MeasureSpec.getSize(heightMeasureSpec);
// 在 MeasureSpec.AT_MOST 模式下,给定一个默认值
//其他情况下沿用系统测量规则即可
if (widthSpecMode == MeasureSpec.AT_MOST
&& heightSpecMode == MeasureSpec.AT_MOST) {
setMeasuredDimension(mWith, mHeight);
} else if (widthSpecMode == MeasureSpec.AT_MOST) {
setMeasuredDimension(mWith, heightSpecSize);
} else if (heightSpecMode == MeasureSpec.AT_MOST) {
setMeasuredDimension(widthSpecSize, mHeight);
}
}

上面代码中在 widthSpecMode 或 heightSpecMode 为 MeasureSpec.AT_MOST 我们就给定一个对应的 mWith 和 mHeight 默认固定值宽高,而这个默认值没有固定依据,需要我们根据自定义的 view 的具体情况去计算给定。

5.1.2 ViewGroup 的 measure 过程

ViewGroup 除了完成自己的测量过程还会遍历调用所有子 View 的measure方法,而且各个子 View 还会递归执行这个过程,我们知道 View Group 继承自 View ,是一个抽象类,因此没有重写 View onMeasure 方法,也就是没有提供具体如何测量自己的方法,但是它提供了一个 measureChildren 方法,定义了如何测量子 View 的规则,代码如下:

1
2
3
4
5
6
7
8
9
10
11
12
13
14
15
16
/**
* @param widthMeasureSpec 该 ViewGroup 水平方向约束条件
* @param heightMeasureSpec 该 ViewGroup 竖直方向约束条件
*/
protected void measureChildren(int widthMeasureSpec, int heightMeasureSpec) {
final int size = mChildrenCount;
final View[] children = mChildren;
for (int i = 0; i < size; ++i) {
//逐一遍历获取得到 ViewGroup 中的子 View
final View child = children[i];
if ((child.mViewFlags & VISIBILITY_MASK) != GONE) {
//对获取到的 子 view 进行测量
measureChild(child, widthMeasureSpec, heightMeasureSpec);
}
}
}

我们再看一下对子 View 进行测量的 measureChild 方法 :

1
2
3
4
5
6
7
8
9
10
11
12
13
14
15
16
17
18
19
20
21
22
23
/**
* @param child 要进行测量的子 view
* @param parentWidthMeasureSpec ViewGroup 对要进行测量的子 view 水平方向约束条件
* @param parentHeightMeasureSpec ViewGroup 对要进行测量的子 view 竖直方向约束条件
*/
protected void measureChild(View child, int parentWidthMeasureSpec,
int parentHeightMeasureSpec) {
//第一步,获取 View 的 LayoutParams
final LayoutParams lp = child.getLayoutParams();
//第二步,获取 view 的 WidthMeasureSpec,其中传入的几个参数说明:
//parentWidthMeasureSpec 父容器的 WidthMeasureSpec
//mPaddingLeft + mPaddingRight view 本身的 Padding 值,即内边距值
// lp.width view 本身期望的宽度 with 值
final int childWidthMeasureSpec = getChildMeasureSpec(parentWidthMeasureSpec,
mPaddingLeft + mPaddingRight, lp.width);
//同上
final int childHeightMeasureSpec = getChildMeasureSpec(parentHeightMeasureSpec,
mPaddingTop + mPaddingBottom, lp.height);
// 第三步,根据获取的子 veiw 的 WidthMeasureSpec 和 HeightMeasureSpec
//调用子 view 的 measure 方法,对子 view 进行测量,具体后面的测量逻辑就是和我们前面分析
// view 的测量过程一样了。
child.measure(childWidthMeasureSpec, childHeightMeasureSpec);
}

上面代码中的第二步调用的方法 getChildMeasureSpec 在标题 4 MeasureSpec和LayoutParams的对应关系 中已经分析过。

ViewGroup 并没有定义具体的测量过程,这是因为 ViewGroup 是一个抽象类,其不同子类具有不同的特性,导致他们的测量过程有所不同,不能有一个统一的 onMeasure 方法,所以其测量过程的 onMeasure 方法需要子类去具体实现,比如 LinearLayout 和 RelativeLayout 等,下面通过 LinearLayout 的 onMeasure 方法来分析一下 ViewGroup 的测量过程。

1
2
3
4
5
6
7
8
9
10
@Override
protected void onMeasure(int widthMeasureSpec, int heightMeasureSpec) {
if (mOrientation == VERTICAL) {
//垂直方向的 LinearLayout 测量方式
measureVertical(widthMeasureSpec, heightMeasureSpec);
} else {
//水平方向的 LinearLayout 测量方式
measureHorizontal(widthMeasureSpec, heightMeasureSpec);
}
}

上面代码可以看出 ViewGroup 内部测量方式分为垂直方向和水平方向,两者原理基本一样,下面看一下垂直方向的 LinearLayout 测量方式,由于这个方法代码比较长,所以贴出重点部分:

1
2
3
4
5
6
7
8
9
10
11
12
13
14
15
16
17
18
19
20
21
22
23
24
25
26
27
28
29
30
31
32
33
34
35
36
37
38
39
40
41
42
43
44
45
46
47
48
49
50
51
52
53
54
55
56
57
58
59
60
61
62
63
64
65
66
67
68
69
70
71
72
73
74
75
76
77
78
79
80
81
82
83
84
85
86
87
88
89
90
91
92
93
94
95
96
97
98
99
100
101
102
103
104
105
106
107
108
109
110
111
112
113
114
115
116
117
118
119
120
121
122
123
124
125
126
127
128
129
130
131
132
133
134
135
136
137
138
139
140
141
142
143
144
145
146
147
148
149
150
151
152
153
154
155
156
157
158
159
160
161
162
163
164
165
166
167
168
169
170
171
172
173
174
175
176
177
178
179
180
181
182
183
184
185
186
187
188
189
190
191
192
193
194
195
196
197
198
199
200
201
202
203
204
205
206
207
208
209
210
211
212
213
214
215
216
217
218
219
220
221
222
223
224
225
226
227
228
229
230
231
232
void measureVertical(int widthMeasureSpec, int heightMeasureSpec) {
......................
//记录总高度
float totalWeight = 0;
final int count = getVirtualChildCount();
//获取测量模式
final int widthMode = View.MeasureSpec.getMode(widthMeasureSpec);
final int heightMode = View.MeasureSpec.getMode(heightMeasureSpec);
...........
//第1步,对 LinearLayout 中的子 view 进行第一次测量
// See how tall everyone is. Also remember max width.
for (int i = 0; i < count; ++i) {
final View child = getVirtualChildAt(i);
if (child == null) {
mTotalLength += measureNullChild(i);
continue;
}
if (child.getVisibility() == View.GONE) {
i += getChildrenSkipCount(child, i);
continue;
}
if (hasDividerBeforeChildAt(i)) {
mTotalLength += mDividerHeight;
}
//获取子 view 的 LayoutParams 参数
LinearLayout.LayoutParams lp = (LinearLayout.LayoutParams) child.getLayoutParams();
totalWeight += lp.weight;
//第1.1步,满足该条件,第一次测量时不需要测量该子 view
if (heightMode == View.MeasureSpec.EXACTLY && lp.height == 0 && lp.weight > 0) {
// 满足该条件的话,不需要现在计算该子视图的高度。
//因为 LinearLayout 的高度测量规格为 EXACTLY ,说明高度 LinearLayout 是固定的,
//不依赖子视图的高度计算自己的高度
//lp.height == 0 && lp.weight > 0 说明子 view 使用了权重模式,即希望使用 LinearLayout 的剩余空间
// 测量工作会在之后进行
//相反,如果测量规格为 AT_MOST 或者 UNSPECIFIED ,LinearLayout
// 只能根据子视图的高度来确定自己的高度,就必须对所有的子视图进行测量。
final int totalLength = mTotalLength;
mTotalLength = Math.max(totalLength, totalLength + lp.topMargin + lp.bottomMargin);
//标记未进行测量
skippedMeasure = true;
} else {
// else 语句内部是对子 view 进行第一次测量
int oldHeight = Integer.MIN_VALUE;
if (lp.height == 0 && lp.weight > 0) {
// 如果 LiniearLayout 不是 EXACTLY 模式,高度没给定,
//说明 LiniearLayout 高度需要根据子视图来测量,
// 而此时子 view 模式为 lp.height == 0 && lp.weight > 0 ,是希望使用 LinearLayout 的剩余空间
// 这种情况下,无法得出子 view 高度,而为了测量子视图的高度,
//设置子视图 LayoutParams.height 为 wrap_content。
oldHeight = 0;
lp.height = LayoutParams.WRAP_CONTENT;
}
//该方法只是调用了 ViewGroup 的 measureChildWithMargins() 对子 view 进行测量
// measureChildWithMargins() 方法在上面 4 MeasureSpec和LayoutParams的对应关系已经分析过
measureChildBeforeLayout(
child, i, widthMeasureSpec, 0, heightMeasureSpec,
totalWeight == 0 ? mTotalLength : 0);
if (oldHeight != Integer.MIN_VALUE) {
lp.height = oldHeight;
}
// 获取测量到的子 view 高度
final int childHeight = child.getMeasuredHeight();
final int totalLength = mTotalLength;
//第2步, 重新计算 LinearLayout 的 mTotalLength 总高度
mTotalLength = Math.max(totalLength, totalLength + childHeight + lp.topMargin +
lp.bottomMargin + getNextLocationOffset(child));
if (useLargestChild) {
largestChildHeight = Math.max(childHeight, largestChildHeight);
}
}
..........................
//以下方法是对 LinearLayout 宽度相关的测量工作,不是我们关心的
if (widthMode != View.MeasureSpec.EXACTLY && lp.width == LayoutParams.MATCH_PARENT) {
.........................
//以上方法是对 LinearLayout 宽度相关的测量工作
if (mTotalLength > 0 && hasDividerBeforeChildAt(count)) {
mTotalLength += mDividerHeight;
}
//第3步,如果设置了 android:measureWithLargestChild="true"并且测量模式为 AT_MOST或者 UNSPECIFIED
// 重新计算 mTotalLength 总高度
if (useLargestChild &&
(heightMode == View.MeasureSpec.AT_MOST || heightMode == View.MeasureSpec.UNSPECIFIED)) {
mTotalLength = 0;
for (int i = 0; i < count; ++i) {
final View child = getVirtualChildAt(i);
if (child == null) {
mTotalLength += measureNullChild(i);
continue;
}
if (child.getVisibility() == GONE) {
i += getChildrenSkipCount(child, i);
continue;
}
final LinearLayout.LayoutParams lp = (LinearLayout.LayoutParams)
child.getLayoutParams();
// Account for negative margins
final int totalLength = mTotalLength;
//每个子视图的高度为:最大子视图高度 + 该子视图的上下外边距
mTotalLength = Math.max(totalLength, totalLength + largestChildHeight +
lp.topMargin + lp.bottomMargin + getNextLocationOffset(child));
}
}
// Add in our padding
mTotalLength += mPaddingTop + mPaddingBottom;
int heightSize = mTotalLength;
// Check against our minimum height
heightSize = Math.max(heightSize, getSuggestedMinimumHeight());
//第4步,根据 heightMeasureSpec 测量模式 和已经测量得到的总高度 heightSize
//来确定得到最终 LinearLayout 高度和状态
int heightSizeAndState = resolveSizeAndState(heightSize, heightMeasureSpec, 0);
//分割线=================以上代码就完成了对 LinearLayout 高度和状态 的测量
//第5步,下面代码是根据已经测量得到的 LinearLayout 高度来重新测量确定各个子 view 的大小
//获取 LinearLayout 高度值
heightSize = heightSizeAndState & MEASURED_SIZE_MASK;
//获取最终测量高度和经过测量各个子 view 得到的总高度差值
int delta = heightSize - mTotalLength;
//第5.1步(第5步中第1小步),如果在上面第一次测量子 view 的过程中有未进行测量的 view 那么执行下面代码
if (skippedMeasure || delta != 0 && totalWeight > 0.0f) {
float weightSum = mWeightSum > 0.0f ? mWeightSum : totalWeight;
mTotalLength = 0;
for (int i = 0; i < count; ++i) {
final View child = getVirtualChildAt(i);
if (child.getVisibility() == View.GONE) {
continue;
}
LinearLayout.LayoutParams lp = (LinearLayout.LayoutParams) child.getLayoutParams();
float childExtra = lp.weight;
if (childExtra > 0) {
// 计算 weight 属性分配的大小,可能为负值
int share = (int) (childExtra * delta / weightSum);
weightSum -= childExtra;
delta -= share;
final int childWidthMeasureSpec = getChildMeasureSpec(widthMeasureSpec,
mPaddingLeft + mPaddingRight +
lp.leftMargin + lp.rightMargin, lp.width);
// TODO: Use a field like lp.isMeasured to figure out if this
// child has been previously measured
if ((lp.height != 0) || (heightMode != View.MeasureSpec.EXACTLY)) {
// 子视图在第一次测量时候已经测量过
// 基于上次测量值再次进行新的测量
int childHeight = child.getMeasuredHeight() + share;
if (childHeight < 0) {
childHeight = 0;
}
// 调用子 view 的 measure 方法进行测量,后面逻辑就是 view 的测量逻辑
child.measure(childWidthMeasureSpec,
View.MeasureSpec.makeMeasureSpec(childHeight, View.MeasureSpec.EXACTLY));
} else {
// 子视图第一次测量,即第一步进行测量的时候未得到测量
//对 view 进行测量
child.measure(childWidthMeasureSpec,
View.MeasureSpec.makeMeasureSpec(share > 0 ? share : 0,
View.MeasureSpec.EXACTLY));
}
// Child may now not fit in vertical dimension.
childState = combineMeasuredStates(childState, child.getMeasuredState()
& (MEASURED_STATE_MASK>>MEASURED_HEIGHT_STATE_SHIFT));
}
// 处理子视图宽度
final int margin = lp.leftMargin + lp.rightMargin;
...........................
// Add in our padding
mTotalLength += mPaddingTop + mPaddingBottom;
// TODO: Should we recompute the heightSpec based on the new total length?
} else {
//第5.2步(第5步中第2小步)执行到这里的代码,表明 view 是已经测量过的
alternativeMaxWidth = Math.max(alternativeMaxWidth,
weightedMaxWidth);
// We have no limit, so make all weighted views as tall as the largest child.
// Children will have already been measured once.
if (useLargestChild && heightMode != View.MeasureSpec.EXACTLY) {
for (int i = 0; i < count; i++) {
final View child = getVirtualChildAt(i);
if (child == null || child.getVisibility() == View.GONE) {
continue;
}
final LinearLayout.LayoutParams lp =
(LinearLayout.LayoutParams) child.getLayoutParams();
float childExtra = lp.weight;
//如果 view 使用了权重即 childExtra > 0,使用最大子视图高度进行重新测量
//否则不进行测量,保持第一次测量值,那么由于 LinearLayout 的高度使用了子 view 最大高度 ,
// 但是子视图没有进行重新测量,没有进行拉伸,可能造成空间剩余。
if (childExtra > 0) {
//使用最大子视图高度进行重新测量子 view
child.measure(
View.MeasureSpec.makeMeasureSpec(child.getMeasuredWidth(),
View.MeasureSpec.EXACTLY),
View.MeasureSpec.makeMeasureSpec(largestChildHeight,
View.MeasureSpec.EXACTLY));
}
}
}
}
if (!allFillParent && widthMode != View.MeasureSpec.EXACTLY) {
maxWidth = alternativeMaxWidth;
}
maxWidth += mPaddingLeft + mPaddingRight;
// Check against our minimum width
maxWidth = Math.max(maxWidth, getSuggestedMinimumWidth());
//第6步,最终设置 LinearLayout 的测量高宽
setMeasuredDimension(resolveSizeAndState(maxWidth, widthMeasureSpec, childState),
heightSizeAndState);
if (matchWidth) {
forceUniformWidth(count, heightMeasureSpec);
}
}

以上代码就是对 LinearLayout onMeasure 分析过程,整个过程原理已经在代码中加以注释说明,这里我们重点分析一下 resolveSizeAndState(heightSize, heightMeasureSpec, 0) 这个方法是如何实现最终确定 LinearLayout 高度值的,方法如下:

1
2
3
4
5
6
7
8
9
10
11
12
13
14
15
16
17
18
19
20
21
22
23
24
25
26
27
28
29
30
31
32
33
34
35
/**
* @param size view 想要的大小,也就是根据子 view 高度测量得到的高度值.
* @param measureSpec 父容器的约束条件
* @param childMeasuredState 子 view 的测量信息
* @return Size 返回得到的测量值和状态
*/
public static int resolveSizeAndState(int size, int measureSpec, int childMeasuredState) {
//获取测量模式
final int specMode = MeasureSpec.getMode(measureSpec);
//获取尺寸值
final int specSize = MeasureSpec.getSize(measureSpec);
final int result;
//根据不同测量模式决定最终测量结果
switch (specMode) {
//如果是 AT_MOST 最大测量模式 ,那么总高度值为测量得到的 size 值,但是最大不能超过 specSize 规定值
case MeasureSpec.AT_MOST:
if (specSize < size) {
//如果测量得到的 size 值超过 specSize 值,LinearLayout 高度就为 specSize 值
result = specSize | MEASURED_STATE_TOO_SMALL;
} else {
//如果测量得到的 size 值未超过 specSize 值,LinearLayout 高度就为 size 值
result = size;
}
break;
case MeasureSpec.EXACTLY:
//如果是 EXACTLY 精准测量模式,即 LinearLayout 值为固定值,那么 最终 LinearLayout 高度值就为 specSize 值
result = specSize;
break;
case MeasureSpec.UNSPECIFIED:
// 如果是 UNSPECIFIED 测量模式,即对子 view 没有限制 , LinearLayout 高度值就为 size
default:
result = size;
}
return result | (childMeasuredState & MEASURED_STATE_MASK);
}

以上代码总结起来就是 LinearLayout 会根据测量子 View 的情况和 MeasureSpec 约束条件来决定自己最终的大小,具体来说就是如果它的布局中高度才用 具体数值,那么它的测量过程和 View 一致,即高度为 specSize 值,如果它的布局中使用 wrap_content 那么它的高度是所有子 View 高度总和,但是不能超过父容器剩余空间。

最后对整个测量过程总结一下就是分为以下几步:

  1. 对 LinearLayout 中的子 View 进行第一次遍历测量,主要是通过 measureChildBeforeLayout 这个方法,这个方法内部会调用 measureChildWithMargins 方法,而在 measureChildWithMargins 方法内部会去调用 child.measure(childWidthMeasureSpec, childHeightMeasureSpec) 方法进行测量。在这次的测量过程中,如果满足了第1.1步测量条件的子 view 不需要进行测量,会在后面的第5.1步中进行测量。
  2. 根据测量各个子 View 的高度会得到一个初步的 LinearLayout 总高度 mTotalLength 值。
  3. 如果 LinearLayout 设置了 android:measureWithLargestChild=”true” 属性并且测量模式为 AT_MOST或者 UNSPECIFIED 重新计算 mTotalLength 总高度。
  4. 根据 LinearLayout 的 heightMeasureSpec 测量模式 和已经测量得到的总高度 mTotalLength ,来确定得到最终 LinearLayout 高度和状态 。
  5. 根据已经测量得到的 LinearLayout 高度来重新测量确定各个子 View 的大小。
  6. 最终执行 setMeasuredDimension 方法设置 LinearLayout 的测量高宽。

6 实际问题解决

View 的 measure 过程和 Activity 的生命周期方法不是同步执行的,因此无法保证 Activity 执行了onCreate、onStart、onResume 时某个 View 已经测量完毕了。如果View还没有测量完毕,那么获得的宽和高都是 0。下面是四种解决该问题的方法:

1、Activity/View#onWindowsChanged 方法

onWindowFocusChanged 方法表示 View 已经初始化完毕了,宽高已经准备好了,这个时候去获取是没问题的。这个方法会被调用多次,当 Activity 继续执行或者暂停执行的时候,这个方法都会被调用,典型代码如下:

1
2
3
4
5
6
7
public void onWindowFocusChanged(boolean hasWindowFocus) {
super.onWindowFocusChanged(hasWindowFocus);
if(hasWindowFocus){
int width=view.getMeasuredWidth();
int height=view.getMeasuredHeight();
}
}

2、View.post(runnable)

通过 post 将一个 Runnable 投递到消息队列的尾部,然后等待 Looper 调用此 runnable 的时候 View 也已经初始化好了。

1
2
3
4
5
6
7
8
9
10
11
@Override
protected void onStart() {
super.onStart();
view.post(new Runnable() {
@Override
public void run() {
int width=view.getMeasuredWidth();
int height=view.getMeasuredHeight();
}
});
}

3、ViewTreeObsever

使用 ViewTreeObserver 的众多回调方法可以完成这个功能,比如使用 onGlobalLayoutListener 接口,当 View 树的状态发生改变或者 View 树内部的 View 的可见性发生改变时,onGlobalLayout 方法将被回调。伴随着View树的变化,这个方法也会被多次调用。

1
2
3
4
5
6
7
8
9
10
11
12
13
@Override
protected void onStart() {
super.onStart();
ViewTreeObserver viewTreeObserver=view.getViewTreeObserver();
viewTreeObserver.addOnGlobalLayoutListener(new ViewTreeObserver.OnGlobalLayoutListener() {
@Override
public void onGlobalLayout() {
view.getViewTreeObserver().removeOnGlobalLayoutListener(this);
int width=view.getMeasuredWidth();
int height=view.getMeasuredHeight();
}
});
}

4、view.measure(int widthMeasureSpec, int heightMeasureSpec)

通过手动对 View 进行 measure 来得到 View 的宽高,这个要根据 View 的 LayoutParams 来处理:

(1)match_parent:无法 measure 出具体的宽高,原因是根据上面我们分析 View 的measure 过程原理可知,此种 MeasureSpec 需要知道 parentSize ,即父容器剩余空间,而这个时候无法知道 parentSize 大小,所以无法测量。

(2)wrap_content: 可以采用设置最大值方法进 measure :

1
2
3
4
5
int widthMeasureSpec = MeasureSpec.makeMeasureSpec((1 << 30) - 1, MeasureSpec.AT_MOST);
int heightMeasureSpec = MeasureSpec.makeMeasureSpec((1 << 30) - 1, MeasureSpec.AT_MOST);
view.measure(widthMeasureSpec, heightMeasureSpec);

注意这里作者为什么使用 (1 << 30) - 1 ) 来构造 MeasureSpec 呢?笔者解释是:”通过分析 MeasureSpec 的实现可以得知 View 的尺寸是使用 30 位的二进制表示,也就是说最大是 30 个 1 即(2^30-1),也就是 (1 << 30) - 1 ),在最大化模式下,使用 View 能支持的最大值去构造 MeasureSpec 是合理的“。为什么这样就合理呢?我们前面分析在子 View 使用 wrap_content 模式的时候,其测量规则是根据自身的情况去测量尺寸,但是不能超过父容器的剩余空间的最大值,换句话说就是父容器给子 View 一个最大值,然后告诉子 View 你自己看着办,但是别超过这个尺寸就行,但是现在我们自己去测量的时候不知道父容器给定的 MeasureSpec 情况, 也就是不知道父容器给多大的限定值,需要自己去构造一个MeasureSpec ,那么这个最大值我们给定多少合适呢?所以这里干脆就给一个 View 所能支持的最大值,然子 View 根据自身情况去测量,怎么也不能超过这个值就行了。

(3)具体数值(dp/px):例如100px,如下 measure :

1
2
3
4
5
int widthMeasureSpec = MeasureSpec.makeMeasureSpec(100, MeasureSpec.EXACTLY);
int heightMeasureSpec = MeasureSpec.makeMeasureSpec(100, MeasureSpec.EXACTLY);
view.measure(widthMeasureSpec, heightMeasureSpec);

以上四种解决方法的代码和原理上面已经详细说明,大家可以根据需要进行选择使用。

结语:

本次笔记主要记录 View 三大流程中的 onMeasure() 测量原理部分,笔者感觉这一部分也是比较重要和难懂的部分,在我们实际中很多问题会涉及到,所以静下心来详细记录,如有理解错误,还望指出,谢谢!!!!!